Upload students' scripts
Upload one big scan of the whole class, or one file per student. Then check that each script goes to the right student.
Uploading does not start marking. New scripts show Not graded yet until you start marking. After that, scripts you upload later are marked as they come in.
Before you start
- Create the assignment first. See Create an assignment.
- Scan the scripts as PDF if you can. Word (DOCX), PNG, JPG and JPEG also work. PowerPoint files cannot be batch uploaded.
- Each file can be up to 200 MB. Files under 10 MB upload fastest.
How ren. tells the scripts apart
ren. matches each script to a student in one of two ways:
- The student ID cover page. A printed first page where each student shades bubbles for their student ID. ren. reads the bubbles.
- The file name. The student's name or student ID in each file's name.
If you have neither, you can still upload and pick the student for each script yourself. You cannot download the cover page from ren.; ask your administrator for it.
Upload the scripts
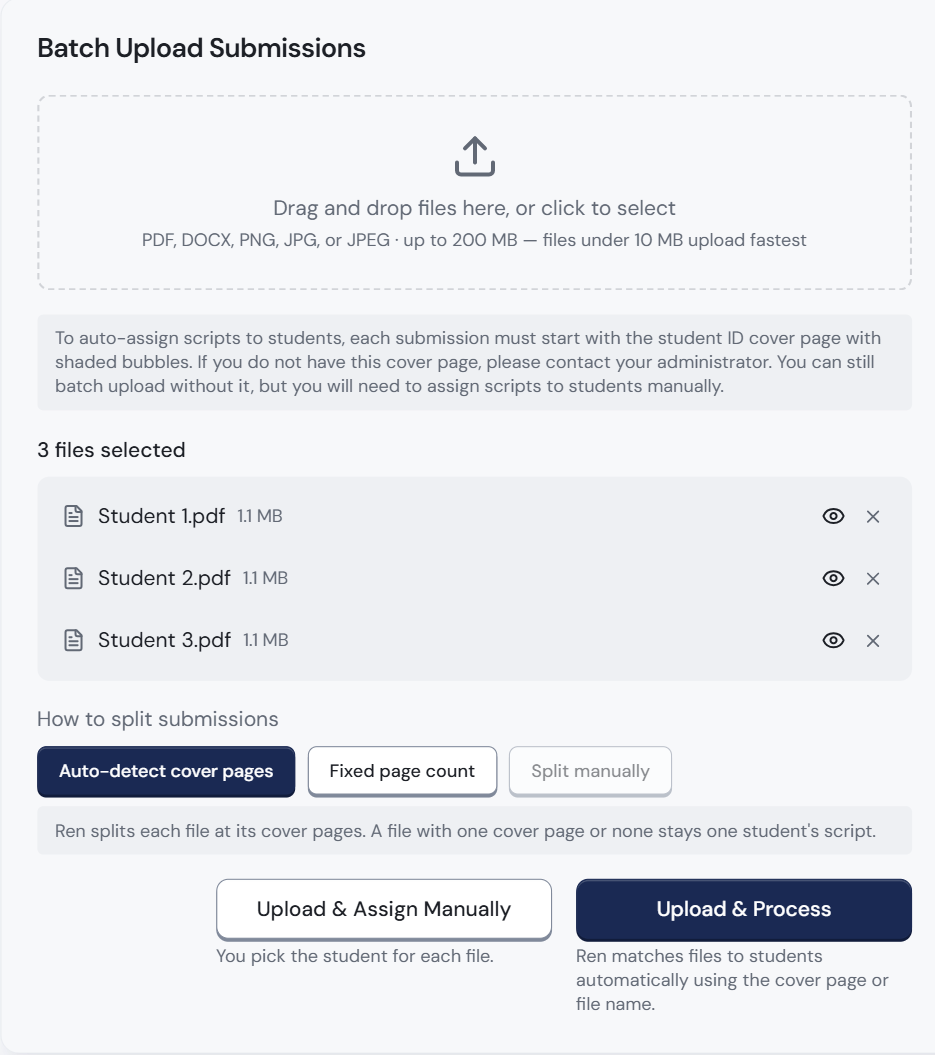
- Open the assignment.
- Under Submissions, click Upload submissions. The Batch Upload Submissions pop-up opens.
- Drag your files into the box, or click it to choose them. The files you chose are listed underneath, for example 3 files selected.
- Under How to split submissions, choose how ren. finds where each student's script starts:
- Auto-detect cover pages: every script starts with the student ID cover page. This is chosen at first.
- Fixed page count: every script has the same number of pages. Type it next to Pages per student, for example 8.
- Split manually: look through the pages and click Split here where each new script starts. One PDF file at a time.
- Click Upload & Process. (For Split manually, click Next: split the pages, mark where each script starts, then click the Upload button.)
- Wait while ren. splits the files and reads the student IDs. This can take a minute.
Upload & Process matches files to students automatically, using the cover page or the file name.
No cover pages and no student names in the file names? Click Upload & Assign Manually instead of Upload & Process, and pick the student for each file yourself.
New scripts show Not graded yet on the assignment page. See Start marking.
How Auto-detect cover pages works
It depends on how many files you upload:
- One file (one big scan of the class): ren. starts a new script at each cover page. If it cannot find any cover page in the file, the upload fails. See If the upload fails. If your scan has no cover pages, click Split by a fixed number of pages instead.
- Several files: ren. splits a file only if it has two or more cover pages. A file with one cover page or none stays as one student's script.
Before you upload, you can click the eye icon to preview a file, or × to remove it.
Check the matches
ren. sorts the scripts into groups:
- Matched: ren. found the student. A label says how: ID match, File name match, or ID unclear - please check.
- Conflicts: this student already has a script in this assignment.
- Unmatched: ren. could not recognise the student ID.
- Look through the Matched scripts. Open any marked please check with the eye icon and fix the student if needed.
- For each Unmatched script, choose the student from Select student.... If ren. has a guess, click Use and the student's name. Or click Skip to leave the script out.
- For each Conflict, choose Skip to keep the student's current script, or Replace to use the new one.
- Click Confirm & Create Submissions. It only works once every unmatched script and conflict is sorted out. The scripts appear under Submissions on the assignment page.
Replace deletes the student's current script and any marking on it. This cannot be undone. Choose Skip if you are not sure.
Uploaded several files and one was split wrongly?
Any file ren. split is listed under Split files, for example scan.pdf · 3 scripts. If it should be one student's script, click Keep as one script. To split it again, click Split into 3 scripts.
Other ways to upload
- One student only: find the student under Not handed in and click the upload icon on their row.
- Closed the pop-up by mistake? Your batch is kept. On the assignment page, click Resume on the Your upload is ready for review banner.
- Students can upload too, including phone photos of handwritten pages. These appear in the same Submissions list.

If the upload fails
This happens when you upload one file with Auto-detect cover pages and ren. cannot find any cover page in it, for example because they are too faint or cut off. Your file stays selected. Choose a button under the message:
- Split by a fixed number of pages
- Split the pages myself (PDF files only)
- Assign each file to a student myself